
How to Properly Adjust Garage Door Tracks?
If you are having problems with your garage door not opening and closing the way it should, the problem might be with the tracks. Garage doors typically open and close by rolling up and down, guided by the two tracks. These tracks run from the floor to the ceiling. On either side of the entrance, there’s a door track designed to help the door’s smooth functioning.
Over time, the garage doors may become misaligned for numerous reasons, and its consistent everyday usage may lead the garage door’s tracks to wear out. This is when you will need to look for a garage door service company sacramento, to get your garage door tracks repaired.
Here Are a Few Signs Indicating Your Garage Doors Need Attention
- The door looks to be out of balance or crooked
- When a door binds, it becomes difficult to open and close
- The door starts to squeak against the rubber molding
If you detect any of the above issues with your garage door, don’t wait for an expert to come. You can try to fix it by readily realigning the off-balance garage doors. Here, we have provided some methods to adjust garage door tracks. However, if the issue is major and you cannot fix it yourself, then don’t take a risk. Consider contacting a garage door company in Sacramento to repair the garage door.
Things You Must Know For Adjusting Garage Door Tracks!
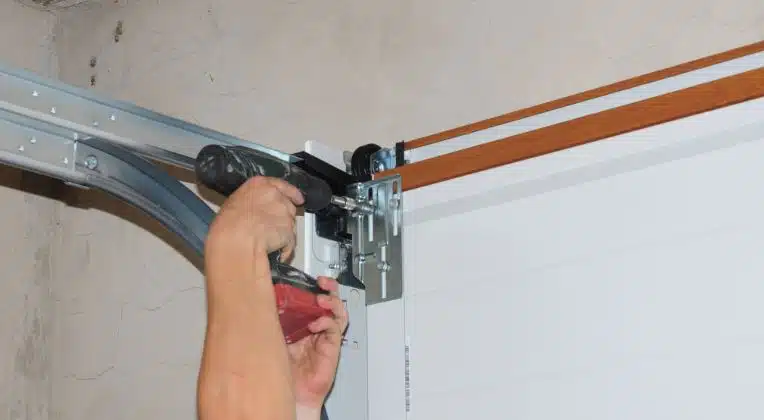
- To adjust the tracks, you must loosen the screws on the brackets where the tracks attach to the door.
- Once the tracks are unfastened, pound them gently with a rubber mallet to slightly modify their placement or angle.
- Once the tracks are in position, tighten the screws on the brackets to secure them and test the door.
- While the track fasteners are typically unlocked and adjusted by hand, you may need a hex key or screwdriver.
Methods To Fix Garage Door Tracks
Method 1: Shifting Vertical Tracks
- Use a screwdriver or wrench to loosen the screws or nuts that hold the lower tracks brackets in place to adjust your lower tracks. Ascertain whether this should be performed on both the left and right tracks.
- You may gently adjust the tracks to the left or right by loosening the bottom track brackets, enabling the garage door to move. Repeat with the other track until there is a 0.64 cm space between the door’s bottom and the top of the crown molding, demonstrating the correct alignment of the tracks.
- Your garage door tracks must be absolutely level for them to work properly. If they aren’t, the door won’t open and close correctly, perhaps resulting in gaps, panel buckling, or door binding. You might need to hire professionals for garage door repair in Sacramento.
- Retighten the screws or bolts holding the bottom track brackets with your fingers. Later, add a few more turns using a screw or wrench, ensuring the fasteners are correctly tightened without peeling.
- Open and close your garage door multiple times to ensure the track’s correct alignment. Be vigilant if you have a manual garage door as something gets damaged during the adjusting procedure.
Method 2: Moving Overhead Tracks
- Loosen the screws or nuts holding the overhead garage tracks in place with a screwdriver or tool. It might imply the fasteners nearest to the door, farthest from the door, or both, depending on which portion of the tracks you need to change.
- To correct mismatched tracks, adjust them left or right until they are perpendicular to the vertical tracks. Simply heighten the tracks to slow down the pace with which your garage door opens.
- After you have adjusted the tracks, the spacing between them and the garage door should be 1.3 cm; otherwise, the door will stick.
- Use a screwdriver or wrench to tighten the nuts or screws holding the overhead tracks in place. It will assist you in preventing undesirable stripping while securely tightening the fasteners.
- Open and close the garage door several times to ensure it functions properly. Check, in particular, if the horizontal tracks can support the door when it’s open.
- Do not stand underneath the door while testing in case it malfunctions.
Wear protective clothing like a long-sleeved shirt, pants or jeans, and heavy-duty gloves to prevent severe injuries. Also, turn off the door opener if you have an automatic garage door before starting the repair work.
Bottom Line
While there are methods and steps you can follow to repair your garage door tracks, it’s always best to call the garage door service company Sacramento for such repairs. Not only is this work potentially dangerous, but it also requires the proper knowledge and licensing to be done correctly. When you put your trust in experts, you can be sure that the job is done to maintain the safety and functionality of your garage door.
Get Your Garage Door Tracks Adjusted With Professional Garage Door Repair Services From Eudy Door
If your garage doors are malfunctioning because of misaligned tracks, you are in the right place. While you can take some DIY steps to adjust your tracks, it’s always best to leave this job to professional garage door repair in Sacramento. Eudy Door is the best garage door company in Sacramento, CA, for all your garage door repair and installation needs. Our skilled team will make sure your garage door is safe, functional, and reliable with our quick and efficient services. So, if you are facing any issues with your garage door, contact Eudy Door today to schedule a service and keep it operating smoothly and safely!
- The Pros and Cons of Garage Doors With Windows: A Complete Guide for Homeowners - June 26, 2026
- Why Garage Door Spring Maintenance Is Crucial for Safety - May 11, 2026
- How Often Should You Schedule Garage Door Maintenance? - April 28, 2026